All posts by Dustyn Roberts

#MM – Emails to professors sent!

In a belated marketing Monday effort (hey, it was a holiday) I managed to send the email below out to the 12 professors on my list so far.

Do you have anyone to add to the list? Are you a professor that would like an evaluation copy? Do you have ideas for making this email better? Let me know in the comments!
___________________________________
Prof. XXX,

I see that you are teaching XYZ this semester, and I’d like to suggest a book I wrote as a companion text: Making Things Move: DIY Mechanisms for Inventors, Hobbyists, and Artists. If you can send me your address I would be happy to have my publisher mail you an evaluation copy. Have a great semester!

Thanks,

Share

Marketing Monday – Engineering Professor List

It turns out the simple task I assigned myself last week was not so simple. I looked up the top 10 undergraduate engineering schools according to US News & World Report and recorded those. Then I started with #1 (MIT) and dug around online until finding the course catalog to see who was teaching design this fall. It turned out that there were about 8 classes taught by 13 different professors that sounded like they might be able to use my book! Now that I’ve identified the professors and their contact info, my next step is emailing all of them an offer of a complimentary evaluation copy of the book. I realize classes in most universities start this week or next, so I plan to get on this ASAP! If you’d like to see the list, click on this link, and feel free to add to it! Thanks

Share

Marketing Monday


(the first result when typing in “marketing” to Google image search)

For a while now I’ve been brainstorming ways to reach out to more potential readers and audiences for Making Things Move.

However, like any highly evolved human, I tend to procrastinate when I don’t have a plan. So, here’s the first step: I’ve decided to implement something I’ll call Marketing Mondays, where I devote an hour or two each week to a combination of brainstorming new ideas and implementing them (both activities required) – catchy, huh?! And I’ll hold myself accountable for this by blogging about it, along with any interesting developments.

So for this first iteration, here are some ideas:

  • Idea 1) Get the book in the hands of professors teaching senior design classes to mechanical engineering students (possibly biomedical engineering and electrical engineering too).
  • Action 1) Get a list of the top engineering schools, find info for and contact professors teaching design at the top 10 schools.

I know there are hundreds, if not thousands of engineering schools out there, but those are the kinds of numbers that lead to procrastination. I’ll start with 10 and go from there. I’ve also been trying to think of ways to reach high school shop and physics teachers, and mentors of robotics clubs. If you know anyone that fits these descriptions, or a resource of how to find names, please do let me know. Thanks!

In the midst of my procrastination, I did manage to create a Facebook page for the book a couple weeks ago. It would be SUPER if you could A) Like it, and B) list it as one of your favorite books in your profile!

And of course I would love to hear your ideas on how to reach out to more potential readers. The school year is just starting so my head is revolving around academia, but I’m of course open to any suggestions you can think of. If you’re REALLY interested in helping out, I’m attempting to hire a book marketing assistant for academic credit. As the post mentions, the role can be filled remotely, so proximity to me in NYC is not required. Spread the word! Thanks.

Share

Real success and a 7 year old maker girl

I had a twitter turned email conversation with the parents of a couple of budding makers that was just too cute not to share!

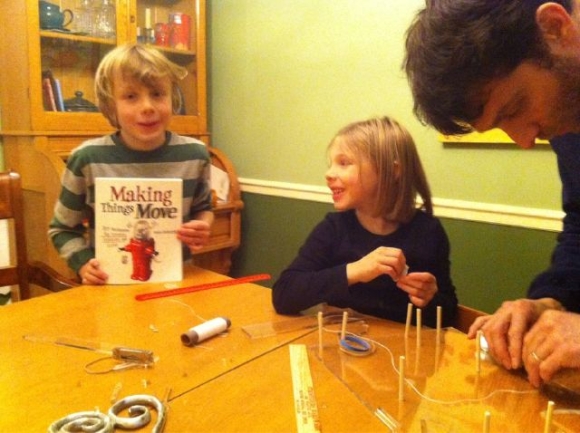
It started when @KateHG4 tweeted a link to this photo:

Then a link to this video of their Rube Goldberg Machine in action! They bought the pieces from my Ponoko.com store. This is the first Rube Goldberg machine I’ve seen made using the plans from the book, and the fact that the whole family was involved is just amazing. Then our conversation went like this:

@dustynrobots: that just brought a HUGE smile to my face – looks like you and your kids were having fun! Mind if I link that vid to my site?!?

@KateHG4: Link away! Daughter (age 7) wants to be an inventor & we’re museum folk, researcher types, not makers. She has this book http://amzn.to/hin56N & we’ve been trying to figure out how to support her. Got your book & found it hugely engaging. Whole family watched the egg syringe video on your site over & over. Had to file down the ponoko pieces a bit to get it to work for this. But it worked & now we’re psyched about moving on to the next chapter. A whole new interest for us, now we’re investigating mindstorms too. Oh, and daughter was over the moon when she figured out you were female.

@dustynrobots: Wow! If she likes those, she’ll LOVE: http://amzn.to/dTZhBX Mind if I put up a blog post about this? My email is dustyn@dustynrobots.com btw. sorry to hear about the ponoko pieces – where were they off? i’d be happy to correct the file for future makers

After that we went to email, she gave me some suggestions for book talks at museums, and she said that even though her and her husband aren’t makers or artists, they found the book very accessible. Now this is what I call real success – when I first wrote the book, I had no idea I would reach a 7 year old little girl that would have fun with the projects and get excited that her cool new book was written by a girl too. Helping support parents that want to support their kids’ maker dreams is a market I had no idea existed. Even if it’s just a market of 1, it makes the whole project totally worth it. And hopefully the parents had fun too!

Share

Laser Cutter How-to

These are step by step instructions for how to use the laser cutters at Eyebeam Art + Technology Center. It’s posted here because I used a lot of laser cut parts for the projects in my book while I was a resident there, and from now on ‘beamers and others can use this as a quick reference.

First things first: join the laser@eyebeam.org list. It’s a good place to ask for help or tips, and alert others if something goes wrong. Roddy handles coordinating the laser lens hand-offs, and Marko is the technical person in charge if things go wrong.

24 hours (or more) before:

  1. Use the inventory checkout system to reserve the laser machine AND a lens. Arrange with Roddy to get the lens (usually he’ll just leave it on his desk).
  2. Reserve a time slot on the Equipment Rooms and Machine Reservations Google calendar

Day of: Inspection and Setup

  1. Inspect laser cutter lens. If it’s foggy, clean it with a q-tip and lens solution. If there’s anything else wrong (cracked, spot that won’t wipe away, etc), report to Roddy/Marko.
  2. Inspect laser bed where you lay the material. The bed should be clean and free of debris. If not, clean with rubbing alcohol and/or acetone and paper towels. In my experience, one of these usually works better than the other but one of them always works.
  3. Open the front hatch and make sure there is no debris around the timing belts for the stepper motors. If there is a lot of built up stuff, get the shop vac and vacuum it out.
  4. Turn the machine on – switch is on the right side towards the bottom in the back.
  5. Turn ventilation on – central switch is needed for either machine, then flip the switch for the “little” or “big” laser. You should hear the compressor on the laser itself start, and see the hose to the laser parts ventilation box change shape as as the air flows. You know this is working when you try to open the laser parts ventilation box, you should feel resistance on the door.
  6. Install laser lens in laser carriage and tighten with three thumb screws. If any screws are missing, report to Roddy/Marko.

Day of: Use

  1. Position material at back left corner
  2. Setting the focal length: You have to adjust the distance the laser is from your material, so the lens can focus the laser beam on your material to cut it. If you don’t focus it, you’ll just have a very expensive flashlight moving around.
    • Hit the Z button. This will move the carriage all the way to the back left. Use the up, right, down, left arrows to get the carriage an inch or so out over the material.
    • Use Z measuring tool to position the carriage. Use the up/down arrows by the Z button to get the whole bed to go up and down. For finer control hit the Select button, then the up/down arrows again. The bottom of the carriage should just rest on the lip of the Z measuring tool.
    • Return Z measuring tool to its home
    • Press the Z button again to get the carriage back to home position
  3. Open Corel Draw. You can use any vector drawing software to create vector cut and raster engraving files. I use the free and open source program Inkscape, but Adobe Illustrator works too. Inkscape will save .svg files, which is what you need top open in Corel Draw. Corel will also recognize .ai files from Illustrator.
    • Lines in Corel Draw must have a “hairline” thickness and be solid colors (black, red, blue, etc)
    • Create a small test shape in the corner of your piece, and make it a different color
  4. Get the binder for your machine (460 or 660) to look up material settings
  5. Go to print, select “old laser”, and click on Properties. If you are cutting something, click the button next to the color of your test shape until it says VECT. Make sure all other say SKIP.
  6. Find your material in the binder and change the three settings to match those for a 60W laser in the category you want (i.e. vector cutting). Power is the percentage of full power given to the laser, speed is how fast the laser will travel, and PPI is pulses per inch. Hit the big SET button. Then hit okay.
  7. Press the print button. Don’t worry, the laser cutter won’t start yet, this just sends your file to the laser printer.
  8. Check that the LCD on the laser cutter screen show your file name and the correct power, speed, and PPI settings. It’s a good idea to press the “next file” button to make sure the laser is prepared to cut the most recent file you sent. If this is correct, press start.
  9. Try not to watch the laser cutter cut! The light is very bad for your eyes, even indirectly reflected.
  10. When your piece is done the machine will beep and the carriage will return to home position. It’s a good idea to let the fume extractor suck out some fumes for a few minutes before opening the lid (especially when cutting acrylic).
  11. Admire your work! Lather, rinse, repeat. Make a note of your favorite material settings once you get them to work.

More advanced tips:

  • If you want to cut more than one thing in a specific order, use a different color for each of those things. Then choose VECT for each of those colors. The laser will cut in the order of the colors you see in the properties screen. This is helpful when you’re first working with a new material, you can make 3 or 4 sample circle cuts with different settings to see what will work the best.
  • You can combine the above with raster engraving as well.
  • It’s a good idea to start with the settings in the manual, then adjust in small steps depending on your material thickness.

Day of: Cleanup and turn off

  1. Put your scrap from your cuts in the bottom of the fume box, and your good parts on the top of the fume box. Let them air out for a while before you use them. Keep the fume extraction fans going for 20 minutes to an hour when you’re done.
  2. Turn off the switches for the fume box fan (middle switch) and laser compressor (for either the little or big laser).
  3. Turn off the laser itself
  4. Unscrew the thumb screws from the carriage, remove the lens, and REPLACE THE SCREWS
  5. Clean the lens and mirror with a q-tip and lens cleaner solution, let dry, then return to box
  6. Clean the laser cutter bed with acetone or alcohol to remove any buildup
  7. Return laser cutter lens box to Roddy
  8. That’s it! That should get you started, but let me know if I missed anything.

    Share

Another Book Party!

Book Launch Party!

For any of you who missed the launch party at Eyebeam in December (or even if you went), come on out to the book party/talk tomorrow at ITP! The book grew from a class I’m teaching there for the 5th time right now, and the department has been kind enough to host this event. If you’ve never been to ITP, now is a great time – the positive energy on the floor is contagious. Refreshments start at 6, then at 6:30 we’ll move into room 50 so I can talk a little bit about the book and answer all of your questions. Oh, and did I mention we’ll be raffling off 2 FREE BOOKS?! See you there!

Share

Book sales tracking and Amazon API wishlist


Highest rank ever!

A lot of people ask me how book sales are going, so I thought I’d share a little bit about what I know. You would this this would be an easy thing to track, but you would be wrong.

As of December 29th, 2010 – about 4 weeks after the book was released – a contact of mine at McGraw-Hill told me they had sold 2,335 units. That number sounded good to me! But the trick is those don’t really count as sold, because those are all the units that are sitting in warehouses of the resellers (Amazon, Barnes & Noble, etc) and could potentially be returned. The “sell-through” number is the real indicator how how many customers have books in hand. That same day, McGraw-Hill told me the sell-through was 75-100 copies a week through the major resellers (mostly Amazon).

I was craving better data, and luckily Amazon answered my call with access to a new Sales Info tab within their site. Any author that has a book sold on Amazon has access to “Author Central” where you can change the description, upload an image of yourself, and now track sales:
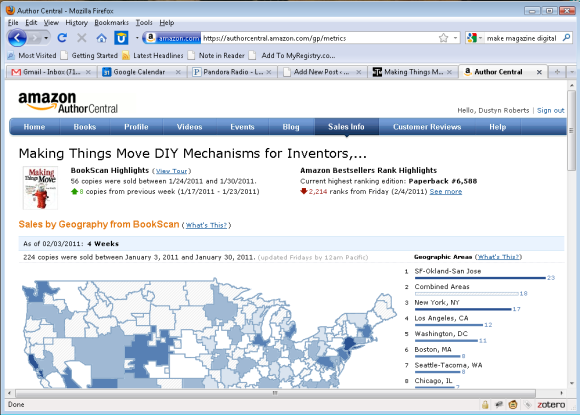
Another trick in the numbers is that this data is provided by Nielsen BookScan and includes only approximately 75% of all retail print book sales in the U.S. Previously this data was only available to publishers, so this is a huge step forward. However, this number does not include international sales or eBook sales. As of January 7, 2011 McGraw-Hill told me there were 497 Kindle sales. That’s a pretty good number too, but that’s the only eBook format they have data on – no idea how many Nook Book or other downloads there have been.

Within the BookScan data, I can see sales by geographical region (above), and totals per week (below).
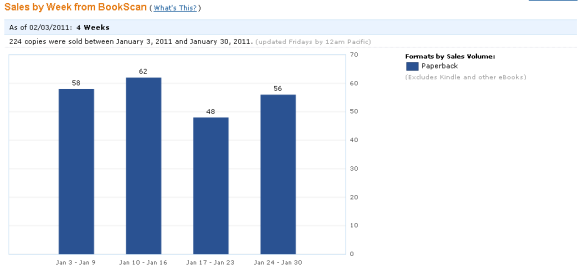
Now Amazon itself doesn’t track number of books sold (or at least they don’t give access to that data) but they do track sales rank for both paperback and Kindle versions. But although this rank gets updated hourly, the only data point that gets saved is the sales rank around midnight Pacific Time.
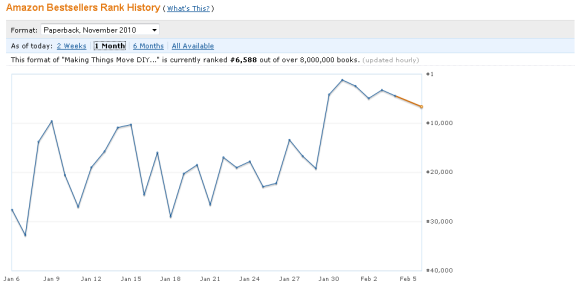
To me it seems silly to go to the trouble of calculating a sales rank every hour, then just losing all that valuable data! I’ve mentioned this a few times in emails to them, but haven’t seen any changes. It would be AMAZING to have more detailed data to track cause and effect of marketing efforts without refreshing my book’s page every hour. For example – what’s the best time to put up a blog post, tweet, or Facebook update in terms of driving sales rank?

Another thing that gets updated hourly but they don’t track at all is sales rank within category. My book has ranged from #1 to unlisted in a few different categories, but I have no access to that history at all.

I realize Amazon does have an API, and there may be some way for me to get all this data collected and stored, but I have no idea how that works – Leave a comment if you do! I would love to post a real time (updated hourly) graph of sales rank on this site but will have to settle for the limited-but-better-than-nothing data Amazon provides for now.

Thanks to everyone who bought my book and helped with these numbers! And finally, I would LOVE if you left your honest opinion in a review on Amazon. Whether you’re a middle school student or a college professor, your opinion is valuable and I would love to hear it.

Share

Vote for SADbot so I can win a laser cutter!


SADbot: the Seasonally Affected Drawing robotMore DIY How To Projects

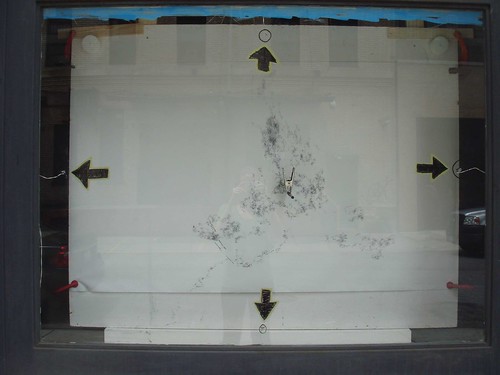
I’ve been meaning to post instructions for SADbot for a while, and the Epilog Challenge at Instructables was just the motivation I needed to get it done. Ben Leduc-Mills and I originally created it for the window gallery at Eyebeam, and we also took a mobile version to Maker Faire NY this past September. The Instructable is the slightly abridged version of project 10-3 in the book. The book version has more explanations, but the Instructable version has color pictures (and more of them) so it was nice to finally pull it together. Now if the Instructables community thinks it’s awesome, I can win an Epilog laser cutter! Amazing! Please help by clicking through to the site above and rating the project and leaving comments.

Thanks! Happy New Year.

UPDATE: I did not win the laser cutter, but I was one of 30 finalists out of over 600 entries! Thank you to everyone that voted.

Share