All posts by Dustyn Roberts

Support SADbot on Kickstarter!

SADbot is the name of the installation that Ben & I are developing for the window gallery at Eyebeam. It will be solar powered and interactive – two things that might be a first for window galleries in general. We realized early on that the costs for project supplies would be pretty high, so decided to try Kickstarter to get funding. We just launched our project this afternoon, and in less than an hour already had three backers! Come join the fun and support SADbot on Kickstarter, then come to Eyebeam starting June 8th to see it in person.

Both SADbot and the mini SADbot we’re offering for higher pledge amounts will be in the examples and projects in Making Things Move.

Share

Teamwork in final month of book development

Photo credit: Flickr user Budzlife, CC-BY

There are a few new members of the Making Things Move team coming on board in this last month before submission. Sam Galison came by Eyebeam for the first time yesterday and will be helping out on a bunch of projects and examples, the first being the Rube Goldberg machine for chapter 1. He’s currently a student at NYU and did an independent study based on my class this past semester. He’s already learned to use the laser cutter and a Dremel and is working out some egg cracking magic as I write. Next up is one of Eyebeam’s student residents, Jade Highleyman, who will be helping on an example for chapter 8 called the agreeable sheep. Finally, next week Stina Marie Hasse Jorgensen, currently a student at Columbia Computer Music Center, will be joining the team a few days a week to work through some of the more technical examples. With all this help I feel a lot better about being ready for the book & bribe party and hitting my final deadline!

Share

75% Deadline completed

My 75% interim deadline was this past Thursday. Check. The Whitney event went very well on Friday (pictures here), and the mousetrap powered cars will probably make it into the book. Check. With all that behind me, I had an extremely lazy weekend for the first time in a while and didn’t feel guilty about it. There was some serious nap time, movie watching, and wine drinking involved. My cat was very supportive of this and out-lazied me, as evidenced in this picture…

Share

Making Things Move is on Amazon! Sort of…

(Image from Amazon.com)

So while I’m procrastinating the day before my 75% interim book deadline, I come across my book listed on Amazon UK for pre-order! I didn’t even know it was going to be sold in the UK. Then I checked the US version, and here it is! For some reason you can’t pre-order it on the US site yet, but you can sign up to be notified when it becomes available. You bet I did.

This is also the first time I’m seeing the cover. My first thought is that I like it. My second is that there are some small pictures of projects done by students they must have pulled of their student blogs linked to my NYU class page. I hope I can give them credit somewhere. My third thought is that although I like how the propeller on the cover with the hand indicates motion, propellers are not part of any of the book projects. The closest I come is a project I plan to include at the end on making a mini wind turbine. I suppose it’s the same idea, but I’m not sure it’s the best way to represent the book’s content. What do you think?

My final thought is that I should stop procrastinating and finish the material for this 75% deadline tomorrow!

Share

I love McMaster-Carr

So halfway through getting all the mousetrap cars ready to race for this Friday’s event at the Whitney, I realized I ran out of eye screws that hold the axles. I remember counting 60 of them, which matched the original number of cars we were going to make, so was excited when the hardware store I got them from had exactly 10 boxes of 6. Unfortunately, I actually needed 120 – 2 on each car! The hardware store I got them from is out now and doesn’t have another shipment coming before Friday, and 5 other hardware stores I checked don’t have the right size. So I bought a size that was slightly off hoping it would work, then just came home to check McMaster. I don’t know why I didn’t do this first. You can search for eye screws by inner diameter, length, wire size (thickness), etc. Of course you can – McMaster is amazing. So now I have two boxes of 50 eye screws on their way to me tomorrow. Phew!!

Share

Rules of Hacking

Another Eyebeam-er, fellow Kaho Abe, lent me this book Handmade Electronic Music: The Art of Hardware Hacking (2nd Ed) by Nicolas Collins after we talked about her upcoming potato orchestra workshop. She uses potatoes to generate enough power to a tiny piezo-buzzer. I realized I had completely overlooked food in my book chapter on power, so am now adding in some stuff from this book. Nicolas goes over using potatoes and fruit to power handmade electronic instruments, and has a list of Rules of Hacking – one of which I thought was particularly funny:

Rule #17: If it sounds good and doesn’t smoke, don’t worry if you don’t understand it

On an “it’s a small world” note, I’ve found two pictures in the book so far featuring work from former students of mine at NYU: Speaker Synth by Lesley Flanigan on pg 280, and Synthinetic by Ithai Benjamin (and Alejandro Abreu).

Share

Mousetrapcar – take 2

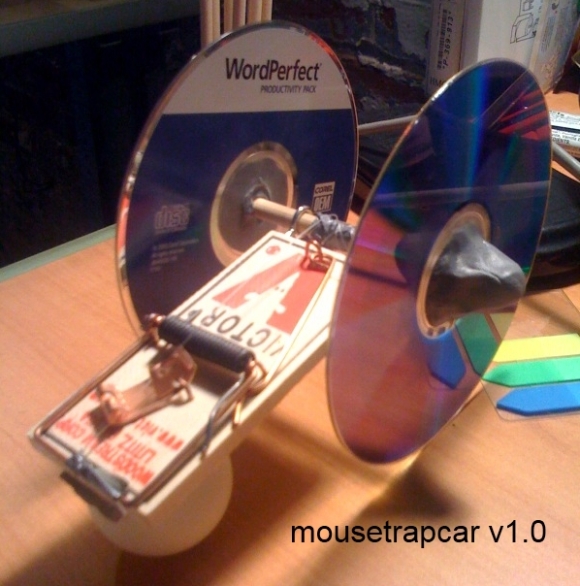
After a weekend away from Eyebeam, I came back to revise my mousetrap powered car to make it faster, easier to assemble, and easier to pack for transport. I wasn’t satisfied with the complete failure of the first minimalist mousetrapcar v1.0:

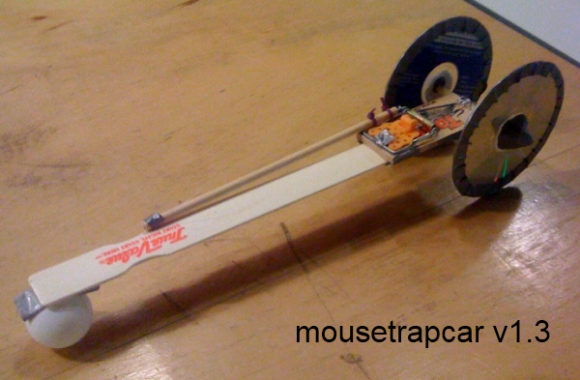
so I hypothesized that if the base was just longer and sturdier, the force of the mousetrap would actually make the car move and not flip over. I also wasn’t happy with using the 1/4″ wooden dowels to extend the mousetrap arm, since I’m trying to minimize cost and therefore material usage. So I un-duct taped the mousetrap from the paint stick mousetrapcar v1.2, and re-duct taped it right up against the back of the paint stick. Then I cut the fishing line from the end of the arm-extender stick and tied it directly to the mousetrap arm, and secured it with some duct tape. Mousetrapcar v1.3 took off so fast across the table that I couldn’t even catch it before it ran into the wall!

An added advantage to this configuration is that I can screw the eye-bolts directly into the wooden mousetrap again since it’s thicker than the paint stick. That eliminates duct tape and/or hot glue that are weaker and more likely to break in transit.

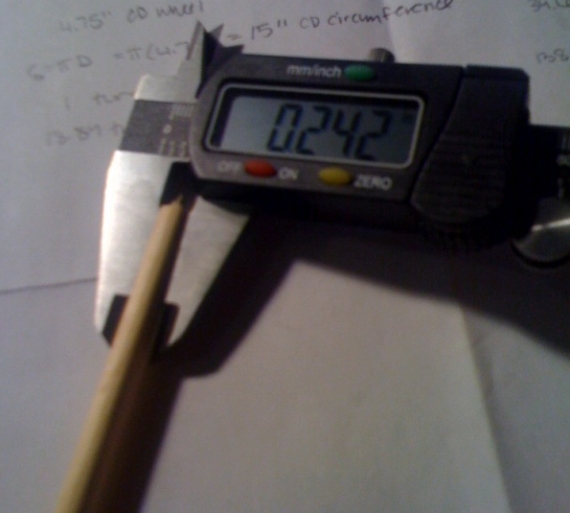
The next trick is to make an easier to assemble version of the wheel with no plumber’s putty. I plan to laser cut some hubs out of scrap acrylic at Eyebeam today, so I measured the 1/4″ wooden dowels to get the inner diameter of the hub:

I know from experience that 1/4″ is never 0.250000″, and in this case the eight dowels I have range from 0.242-0.257″. I want the hub to fit tightly, so I’ll make the inner diameter 0.240″ to fit the smallest dowel and can always sand the shaft a little for the larger ones. Then I measured the inside diameter of the CD with my caliper, and they come in at about 0.591″. I drew these circles up quickly in Inkscape, saved them as .eps files, and opened them up in CorelDraw on the computer here at Eyebeam to send to the laser cutter. Then I found some scrap acrylic (I think), and cut out a couple test pieces with some help from Yael – thanks! After a couple tries to get the right setting to cut all the way through the material, I cut out 2 hubs. The fit on the wooden dowels turned out pretty tight, but the fit between my laser cut donut and the CD was pretty loose. Oh well, nothing a little hot glue and duct tape can’t solve.

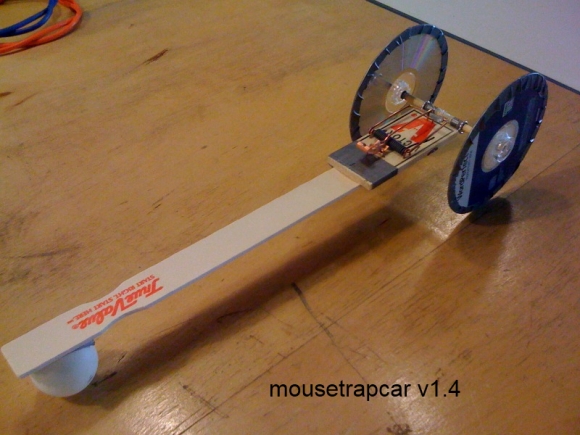
So on my next try, I changed the dimensions to 0.242″ and 0.596″. Of course now the insides of the acrylic hubs are too loose on the smallest wooden dowel, and I need to use some duct tape. The 0.596″ outside diameter still slips though, so the hubs will be hot glued to the CDs. Here’s a picture of the final version with the fancy laser cut hubs:

Ta da! Done. Well, almost. I tested v1.4 on wooden desks, carpeted floor, a steel catwalk, and the concrete floor here. So far I’m 4 for 4. These will make up half the kits for the event this Sunday – the other half will have fully laser cut wheels at a slightly different diameter than the CDs to make things interesting. Now to cut the dowels and put all these into kits…

Share

Racing mousetrap cars at the Whitney Biennial

I’ve been invited by Aki Sasamoto, one of the Whitney Biennial artists, to participate in a kind of workshop at the Whitney on April 16th. She’s a co-director and founding member of the NYC non-profit Culture Push along with my student Arturo Vidich. The event is based on her past DOING workshops, which bring together a small group of 10 professionals to share a little bit about each one’s practice with each other. As she says, the goal of this workshop is to introduce all the participants to other ways of thinking through doing. We’re starting with a private event on April 4th for these 10 people a week before the Whitney event. Each person prepares an activity that can be executed in 30-60 minutes by the other participants. The list of participants hale from a wide variety of backgrounds:

Matthew Bauder (Composer/Saxophonist)
Serra Victoria Bothwell Fels (Metalsmith/Designer)
Deborah Gorman (Chef)
George W. Hart (Mathematician)
Tim Hyde (Artist)
Yvone Meier (Choreographer)
Saul Melman (Artist/Doctor)
Igal Nassima (Programmer)
Ashley Rawlings (Editor, writer and art historian)
…and myself.

The event at the Whitney is open to the public and will accommodate about 100 people that get to rotate through 6 different activities. Our 30-60 minute activities from April 4th will be distilled into 20 minute mini-workshops in which each participant will get to execute or practice a skill that deals with the leader’s profession. After some discussion with Aki, we settled on a version of an assignment I give my students every year: mousetrap powered cars.

There are more constraints on this project than I give my students on their assignment…
1) We figured designing 2 different versions would add some spice to the events. The two versions will be similar with one important difference – for example, wheel size – so the effect is noticeable.
2) Between the 10 person workshop and the event at the Whitney with 2 groups of 20, I need to come up with ~60 mousetrap car kits (which leaves a few for spare parts/demo models). This means I can’t just cobble together parts I have lying around, but need to identify parts that I can buy 60 of. Preferably locally sourced so I don’t have to pay for/wait for shipping. These kits will have a second life as a project in my book, so this exercise will be a good test.
3) I have an approximate budget of $200. $200/60 = $3.33 per car. The mousetraps already cost $1 each, so that’s $2.33 left for everything else.
4) The kits need to pack flat, or close to it, so it’s easy enough for me to transport 60 of them by myself without anything breaking.
5) The kits must assemble and be raced within 20 minutes.

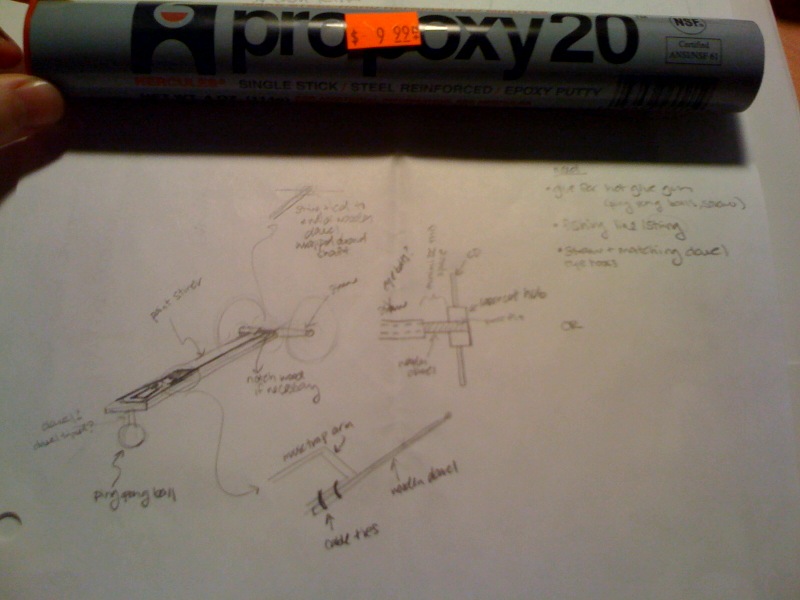
So, I set out to the hardware store to get some basic supplies and start trying to build the simplest mousetrap car possible. I got 60 mousetrap cars, 8 1/4″ diameter wooden dowels, eye bolts that fit the dowels, plumber’s putty, and fishing line. I asked to buy 60 of those wooden paint stirring sticks to use as the car base, and they threw them in for free – thanks Artie’s! Then I sketched out some quick ideas:
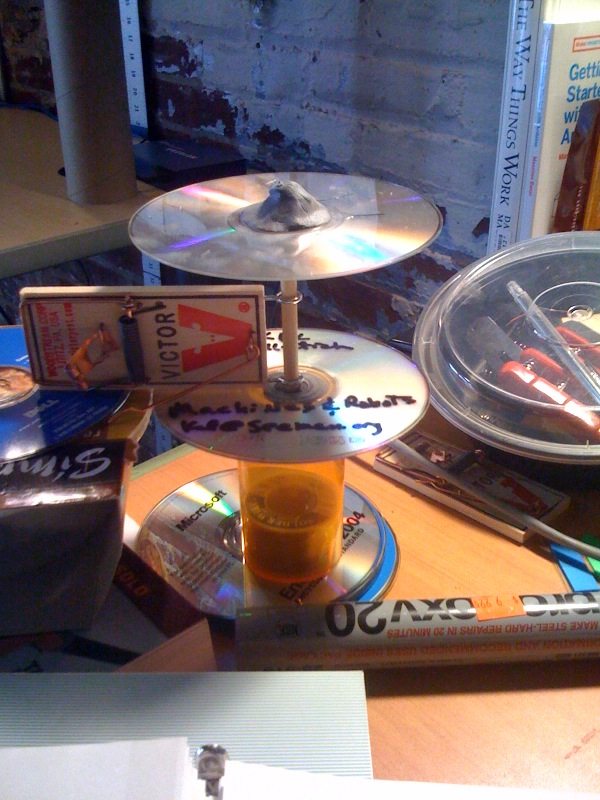
Two students of mine, Russ and Kody, built a very minimalist mousetrap racer for their class assignment. Inspired by this idea, I set out to simplify the design even further: use the ping pong ball as a caster and not a rotating wheel, and stick it to the bottom of the mousetrap instead of using an extension. I used some old CDs for wheels, and plumber’s putty to hold the wooden dowels in place in the center of the CDs. This putty is actually a two part glue with the consistency of clay – if you get the stick type, all you do is twist off a piece, mush it around in your fingers until the two different colors of “clay” blend into one, then stick it on anything. In 10-20 minutes it hardens like steel and you can drill it, sand, it, and treat it more or less like metal. Amazing stuff. You can see the putty on the end of the axle below, along with the eye-bolts that were screwed right into the mousetrap base to hold the wooden dowel axle.
I figured this first car would just flip over, but I wanted to see how few parts I could use. So I stuck the ping pong ball on the end of the mousetrap with some duct tape, and tied some fishing line to the moustrap arm and the axle. Then I wound up the fishing line around the axle by spinning the wheels, set the mousetrap, and watched mousetrapcar v1.0 fail. As I figured, the axle of the car was too close to the mousetrap spring axis, so the force was so high it just peeled out and since there was no extended base to support it, it kind of flipped over. I could add some foam or rubber for traction on the edge of the CD wheels, but I wasn’t confident that was the best solution. So I opted for using the paint stirring sticks as a base to lengthen the distance between the car axis and the mousetrap spring axis, therefore decreasing the spinning force on the wheels, and put some duct tape on the CD edges to increase friction just a little…
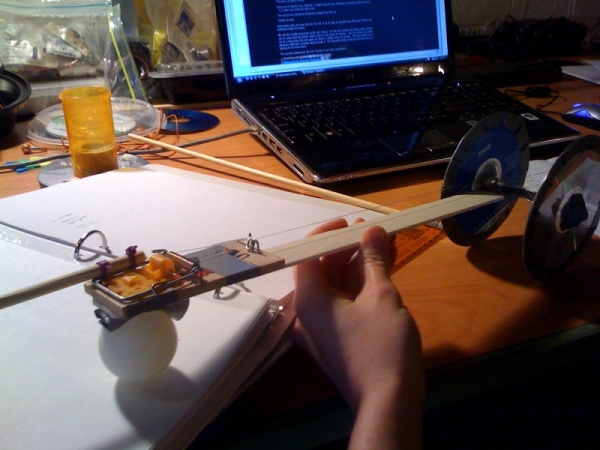
Mousetrapcar v1.1 worked – sort of. The eye-bolts can’t screw right into the paint sticks because they are too thin and just split, so I tried duct tape first but hot glue worked much better. Also, the fishing line got a little caught up in the eye-bolts, and the car was reeeeeeaaaaallly slow. So, for the mousetrapcar v1.2, I made two changes:
1) Contain the fishing line with duct tape inside the eye-bolts, so it doesn’t get tangled. I also did some calculations to see exactly how much line I would need, so I didn’t have extra line that would contribute to tangling and not get used.
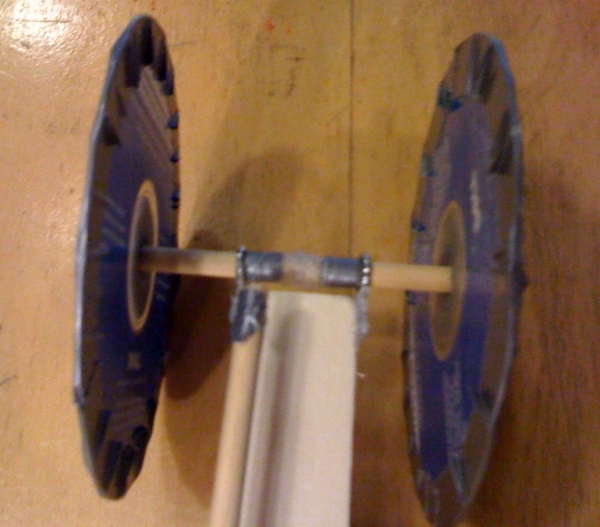
2) Move the mousetrap closer to the wheel axis (and cut the wooden dowel arm to match) to increase the force a little, to make the car go faster.
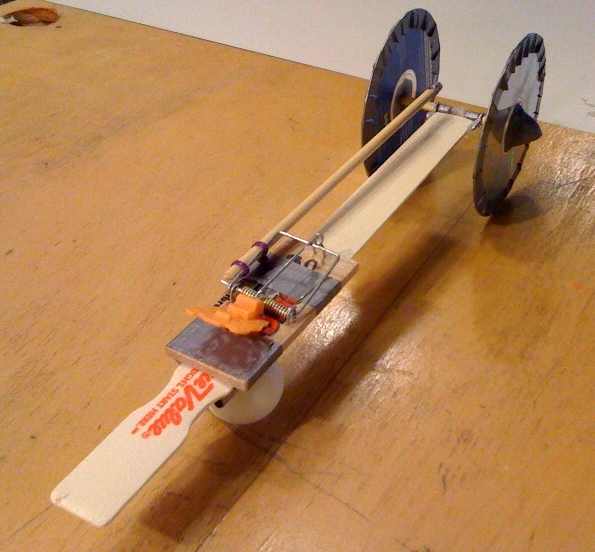
Mousetrapcar v1.2 works pretty well, but is still too slow and gets stuck easily even on the smooth table at Eyebeam I was using for tests. So my next step when I get back to Eyebeam is to move the mousetrap even closer to the wheel axis to increase the pull force and make the car go faster and handle a bumpy floor better. I also need to laser cut hubs for the wheels for the Whitney version because the plumber’s putty takes too long to harden. I have enough old CD’s for ~20 mousetrap cars, so that will be version 1, and then I’ll just laser cut wheels that fit right onto the wooden dowels for version 2.

Continued here

Share